April 29, 2009

spring rolls

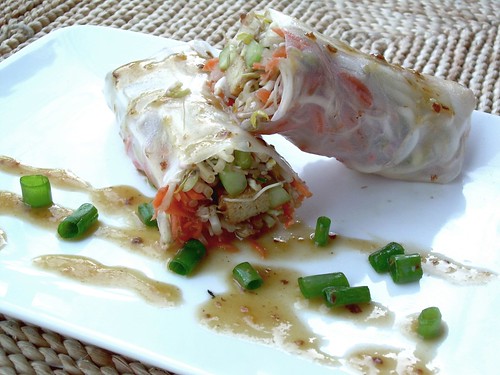
Happy Spring! Rolls! Green onions are in season! Cucumbers are not quite in season but the one we used came from a farmer's green house so that almost counts as in season... And of course, bean sprouts are always in season.

For this recipe, I tried to imitate my favorite spring roll ever from a Thai restaurant near my parent's house in Wisconsin. I will have to go back there sometime so I can perfect the flavors. I did manage to capture the main idea - a watery, sweet refreshment for the warming weather.

Serving Size: 10 spring rolls

Spring Roll Ingredients:
10 rice paper sheets
2 c. bean sprouts
1 c. green onions, diced
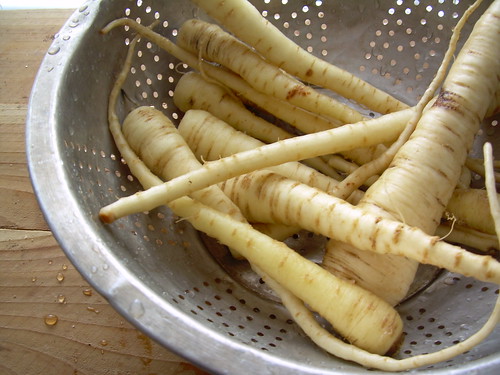
1 cucumber, sliced thin legthwise
1 carrot, shredded
1/2 lb. tofu, marinated in plum sauce

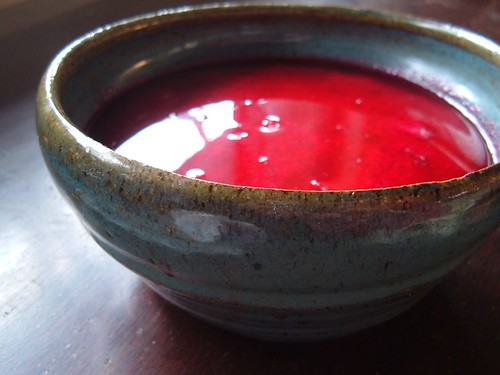
"Plum" Sauce Ingredients:
8 prunes, minced
1 clove garlic, minced
1/4 c. water
1/4 c. white wine
2 T. braggs amino liquids or soy sauce or tamari
1 T. frozen orange juice concentrate
1 T. honey
1/2 T. peanut oil
1/2 t. frozen minced ginger
a pinch of red pepper flakes

Dipping Sauce Ingredients:
1/4 c. braggs amino liquids or soy sauce or tamari
2 T. rice vinegar
1/2 t. garlic powder
a pinch of red pepper flakes

Cut your tofu into strips about 1/4" x 1/4" x 1". In a dry frying pan (no oil), cook your tofu strips on low-medium heat. Flip the tofu strips and cook until all sides are golden. Dry frying removes a lot of moisture from the tofu which helps it to better soak up your "plum" sauce marinade.

In a blender or food processor, add all of you "plum" sauce ingredients and blend until uniform. Put the "plum" sauce and cooked tofu strips in a plastic bag and let it marinated for a several hours in the refrigerator.

After the tofu strips have marinated and you have prepped the veggies, you can start assembling the spring rolls. Dip a sheet of rice paper in warm water for 5-10 seconds or whatever the packaging says. Lay the wet rice paper on a plate. Across the center spread a line of spouts, sliced cucumbers, shredded carrots, diced green onions, and marinated tofu.

At the ends of the filling line, tuck in the sides of the rice paper. Pull one of the long sides of the rice paper over the filling line. Tightly tuck it under the filling line and roll. If I just totally confused you, check out this video on You Tube: "Viatnamese Spring Roll"

Now the only thing left is to mix together the dipping sauce ingredients and sprinkle your plate with green onions.

Side Note:
If you aren't serving a party or large family, you can store the ingredients separately and the prepare on demand or you can store pre-made rolls.

April 27, 2009

mung bean sprouts

Bean sprouts used in spring rolls and stir-fries are germinated from mung beans. And guess what, you can sprout them in your very own home! The home sprouting process is very rewarding. You can witness so much growth and change as these little guys pop out of their shells. It serves as a reminder that stagnant dried beans are actually bursting with life.

Yield: 4 cups (unpacked)

Ingredients:
2 margarine tubs
1/3 c. dry mung beans
cool water

I made a sprouting container by drilling many small drainage holes in the bottom of a margarine tub. I also drilled a few breathing holes on the side. A second margarine tub should be left as is so that you can stack the containers and hold water.

For the most part I followed the sprouting outline on Sprout People.

Soak the mung beans overnight in cool water in the margarine tub without holes. In the morning transfer them into the margarine tub with drainage. Rinse with cool water. Drain thoroughly. Store on a wire rack in a shady spot with plenty of air circulation. Place a weight (like a mason jar filled with water) on top of the beans. The weight makes the sprouts grow a little fatter.

For the next 3 days, rinse the beans/sprouts with cool water every 12 hours. You can remove the weight while you are rinsing but be sure that you do not disturb the order of the sprouts. Rinse with a trickle of water or a kitchen sprayer for a minute or so. Just try to be gentle. Undisturbed sprouts will create a net of pressure which will help them grow straighter and fatter.

On the 4th day, place the margarine tub with drainage inside the margarine tub without drainage. Gently fill the stacked containers with cool water. Allow the sprouts to soak for 15 minutes. Remove the margarine tub with drainage and allow the sprouts to thoroughly drain. Then let the sprouts grow for 24 hours without anymore rinses.

Finally, you can remove the tightly packed sprouts from the margarine tub. Eat them immediately or store them in the refrigerator.

Side Note:
I personally think that it is a good idea to use beans that sold are specifically for sprouting. Sprouting beans have fewer non-germinating duds. People say that non-germinating duds can be a problem because they can spoil while other beans are sprouting. Dud spoilage could potentially spoil your whole batch which, as a beginner, does not sound fun. You can usually buy sprouting beans from a health food store.

April 18, 2009

roasted parsnip fries with creamy curry dip

Today was the tail end of a heavy snow/rain storm. The farmers at the farmer's market seemed pretty elated with the precipitation even though it meant they had to sell their produce in bad weather. We were pretty happy too since they showed up despite the bad weather. We were able to purchase some local produce including parsnips!


The farmer that we bought the parsnips from recommended roasting them like steak fries so when we got home, that's what we did! We were brainstorming a dip for the fries, and we remembered a delicious curry dip with pub fries that we had at local restaurant a few weeks ago. Since it was still storming outside, we decided to entertain ourselves by making the curry powder from scratch, but you could just as well use a store bought curry powder.


Serving Size: snack for 4

Roasted Parsnip Fries Ingredients:
1/2 lb parsnips
2 T. canola oil
3 cloves garlic, minced
1 t. cumin, ground
1 t. coriander, ground

Creamy Curry Dip Ingredients
3/4 c. (6 o.z.) yogurt
1/4 c. water
1 T. frozen turmeric, minced (or 1 t. ground turmeric)
1 t. frozen ginger, minced
1/2 t. cumin, dry roasted, ground
1/2 t. cardamom, dry roasted, ground
1/2 t. coriander, dry roasted, ground
1/2 t. dark brown mustard, dry roasted, ground
1/4 t. cayenne pepper, dry roasted, ground

Cut the parsnips into quarters or eighths and put them in a large bowl. Coat them in oil and spices. Roast the parsnips at 425 for 30 minutes in a preheated oven, flipping them halfway through.

If using pre-made curry powder, just add 1-2 tablespoons to the yogurt, along with 1 T. of canola oil. If attempting to make the curry powder from scratch, grind and dry roast all of the spices. You can use ground turmeric, but I bought a tiny piece of fresh turmeric root and wanted to try it out. If using frozen minced turmeric or ginger (a great way to keep these ready for use), cook them in 1/4 c. water in the microwave or on the stove until the water is all or almost all gone. Add 1 T. oil, the dry roasted spices, and finally, the yogurt!

April 12, 2009

seth ellis chocolates

Organic, fair trade, fancy pants chocolates by Seth Ellis a local chocolatier who sells at the Boulder Farmers' Market!! Sure makes a person appreciate our luxurious world!

April 11, 2009

mini quiches filled with sunchoke and carrot

The farmer's market started up again! The pickings are still slim but the promise of the coming season is in the air. The best new addition of local seasonal produce in our lives is mixed braising greens (spinach, kale, chard, etc).

With our in-season greens, sunchokes and carrots we made mini quiches. They are perfect morsels for packing in a lunch. Plus, the mini quiches offer more crust per serving --- which is how we like it.


Serving Size: 12 mini quiches

Crust Ingredients:
2 1/2 c. flour
1 t. salt
2/3 c. canola oil
1/3 c. cold water

Quiche Filling Ingredients:
3 eggs
1 c. whole milk
2 c. greens, chopped finely
1/2 c. sharp cheddar cheese, diced
1/2 c. sunchokes, diced
1/2 c. carrots, diced
1/2 c. onion, diced
3 cloves garlic, minced
1 T. canola oil
salt

Butter a muffin pan. In a bowl, mix together the crust ingredients until they come together. On a floured counter, roll out the dough 1/4" thick. Cut out circles with a bowl about 5" in diameter. Gather the edges and place in the muffin pan.

In a frying pan, saute the carrots and sunchokes with canola oil and a pinch of salt. After 5 minutes or so add the onions and saute the mixture until the onions are translucent. Add garlic and greens. Cook until the greens have softened. Allow to cool. Add cheese and disperse the mixture to each muffin compartment.

In a small bowl whisk together the milk and eggs. Cover the filling in each muffin tin with the egg/milk mixture. Put the muffin pan in a preheated oven at 375 degrees for 50 minutes or until a knife come out clean.

April 4, 2009

borscht soup

Beets are one of the few vegetables we can find pretty much year round in our cool climate zone. They are so hardy and yet they somehow manage to be nutritious and beautiful too!

Serving Size: 3


Ingredients:
3 small beets, diced (1 c.)
3 c. water
1 T. sugar
1 t. salt
1 t.
"better than bouillon" vegetable base
1/8 cabbage, diced (1 1/2 c.)

2 T. lemon juice

1/2 t. dill

1/2 c. plain yogurt

1 t. all-purpose flour

Add the beets, water, sugar, salt and vegetable base to a medium pot and bring to a boil. Boil until the beets are tender, about 20 minutes. Puree the tender beets with an immersion blender.

Add the cabbage, lemon juice and dill to the pot. Allow to simmer until the cabbage is tender and has absorbed the red beet juice, about 20 minutes.

Take the pot off the heat. Remove some hot liquid with a measuring cup. Mix the flour, yogurt and hot liquid thoroughly. Add the creamy mixture to the soup and serve!


Side Notes:

The main ingredient of real Polish borsht is kwas which is fermented beets. Since we did not feel like fermenting our beets, we just added lemon juice. Honestly, if you were being a purist, kwas is all you would really need to have borsht. The dill and yogurt are fluffy additions. Also, if you were any other person making a creamy borsht, you would add sour cream not yogurt. W
e prefer to use plain yogurt only because it is so versatile.