Showing posts with label sauce. Show all posts

May 29, 2010

nacho ordinary cheese sauce

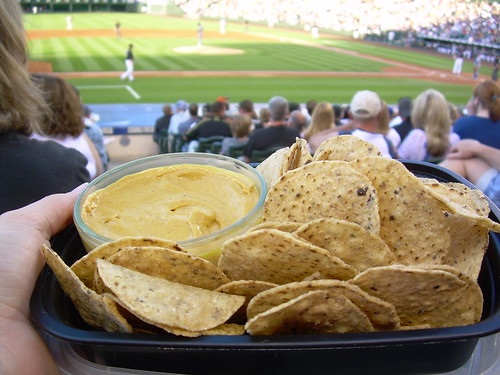
"Hey, what kind of sauce is that?" "It's nacho ordinary cheese sauce." Ahhahahah...

My architecture firm has season tickets to the Colorado Rockies which means Eric and I get to go to 2 games a season. I am not all that into sports but I do enjoy sitting outside, eating peanuts, and drinking beer. The experience could only get better if a concession stand sold veggie dogs or quality nachos, but alas they do not. No worries though, because the stadium allows you to bring in your own food so we brought nacho chips and a vegan nutritional yeast sauce.

Nutritional Yeast Sauce Ingredients:
3/4 c. soy milk
1 c. nutritional yeast flakes
2 T. olive oil
1 t. apple cider (or other) vinegar
1 t. garlic powder
1/2 t. onion powder
1/2 t. paprika
1/2 t. black pepper
1/4 t. salt (or to taste)
dash cayenne

Combine everything and blend with hand blender, stand blender, or fork. You can heat if you want, but it's not necessary.

September 2, 2009

green chile

I was first exposed to green chile on my way to a Taos, NM. I flew to Albuquerque and caught a ride to Taos with the family I sat next to on the plane. They took me to a restaurant in Santa Fe and explained to me all about green chile and red chile and how the official state question is "red or green?" I like when regions have their own food specialties or trademarks: Chicago has deep-dish pizza; the Southwest (or more specifically New Mexico) has red and green chile.

So, when I saw tomatillos and smelled roasting green chiles at the farmers market last week, I decided I wanted to try making green chile for myself. If you've never eaten a raw tomatillo, do it. Inside the papery husk, the surface of the fruit is sticky and sweet, like honey. And the fruit itself is almost like a grape or berry (well, technically, it is a berry). Well, they have now all been mixed with chiles we roasted on the grill, along with onions, garlic, vegetable stock, and flour loosely following this recipe. We've been enjoying it on egg sandwiches, hashed cauliflower, and burritos. We also made a delicious uncooked tomatillo salsa.

August 6, 2009

peanut coconut sauce

This peanut coconut sauce is great for those days when it's too hot to cook (or when you're too lazy to cook). It is also a great way to celebrate fresh broccoli. I followed a recipe from Vegetarian Planet by Didi Emmons that includes peanut butter, coconut milk, chopped peanuts, soy sauce, rice vinegar, ginger and garlic.

May 3, 2009

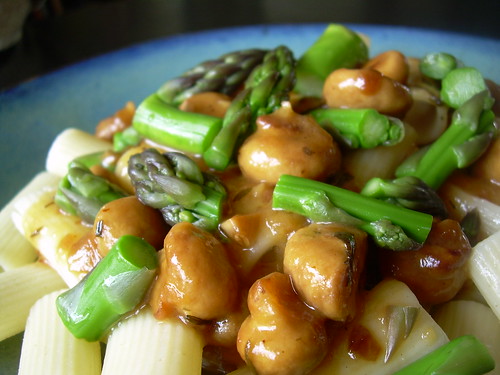
asparagus pasta with buttery mushroom sauce

Someday when we have a small patch of land, we will create a dense permaculture garden that features perennial fruits and vegetables, one of which will be asparagus. Until then, we will do our best with container gardening.

Asparagus takes three years to establish itself. Once it is established you can harvest spears in the spring until the weather gets warm. Last week, a friend of ours shared baby asparagus spears with us while we were touring his garden. They were so tender and delicious!

This week, asparagus made its debut at the farmers' market. We decided to make a pasta with asparagus and mushrooms. We really wanted the asparagus and mushrooms to stand out, so we just made a simple buttery sauce. We actually still have dried mushrooms left from our winter stockpile, but because it is a fresh new season we decided to use fresh mushrooms from Hazel Dell Mushrooms.

Serving Size: 4

Ingredients:
1/2 lb rigatoni pasta, dry
1/2 lb asparagus
1/2 lb tiny cute as a button mushrooms, whole
4 cloves garlic, minced
3/4 c. (3.5 oz) yellow onion, finely diced
1/2 c. "earth balance" margarine
1/4 c. mirin or white wine
1/4 c. water
2 T. rice vinegar
2 T. all purpose flour
1 T. tarragon (dried or fresh)
1 T. canola oil
1/8 t. black pepper
salt to taste

Start the onions sauteing in canola oil and add a pinch of salt. Add 3 of the 4 garlic cloves, mushrooms, 2 T. margarine, black pepper, and another pinch of salt. Cook on low/medium heat.

In the mean time, bring water to a boil in a medium pot. You can boil the pasta and steam the asparagus at the same time (deliciously efficient). Boil the pasta for about 10 minutes or until cooked. Steam the asparagus spears over the boiling pasta water for 5 minutes or until they are bright green. Rinse the asparagus spears in cold water so they stop cooking themselves and cut 1 inch segments.

When the mushrooms are soft and golden, add the tarragon and the remainder of the margarine. When the margarine is all melted, mix the mirin/wine, water, flour, the last garlic clove, and another pinch of salt. I like adding garlic at different stages to get different flavors from it. Add rice vinegar and remove the pan from the heat. The vinegar helps to release all of the butter from the pan and adds some zing to the sauce.

Top the pasta with the mushroom sauce and asparagus. Grind black and cayenne pepper on top to taste!

Side note:
If you can't find any tarragon, you can substitute anise or fennel. Here's a nice quote about tarragon:

"I believe that if ever I had to practice cannibalism, I might manage if there were enough tarragon around." --James Beard

April 29, 2009

spring rolls

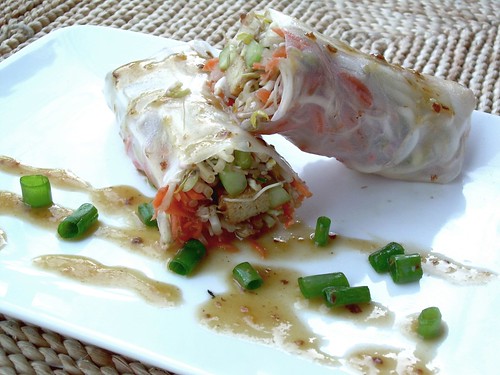
Happy Spring! Rolls! Green onions are in season! Cucumbers are not quite in season but the one we used came from a farmer's green house so that almost counts as in season... And of course, bean sprouts are always in season.

For this recipe, I tried to imitate my favorite spring roll ever from a Thai restaurant near my parent's house in Wisconsin. I will have to go back there sometime so I can perfect the flavors. I did manage to capture the main idea - a watery, sweet refreshment for the warming weather.

Serving Size: 10 spring rolls

Spring Roll Ingredients:
10 rice paper sheets
2 c. bean sprouts
1 c. green onions, diced
1 cucumber, sliced thin legthwise
1 carrot, shredded
1/2 lb. tofu, marinated in plum sauce

"Plum" Sauce Ingredients:
8 prunes, minced
1 clove garlic, minced
1/4 c. water
1/4 c. white wine
2 T. braggs amino liquids or soy sauce or tamari
1 T. frozen orange juice concentrate
1 T. honey
1/2 T. peanut oil
1/2 t. frozen minced ginger
a pinch of red pepper flakes

Dipping Sauce Ingredients:
1/4 c. braggs amino liquids or soy sauce or tamari
2 T. rice vinegar
1/2 t. garlic powder
a pinch of red pepper flakes

Cut your tofu into strips about 1/4" x 1/4" x 1". In a dry frying pan (no oil), cook your tofu strips on low-medium heat. Flip the tofu strips and cook until all sides are golden. Dry frying removes a lot of moisture from the tofu which helps it to better soak up your "plum" sauce marinade.

In a blender or food processor, add all of you "plum" sauce ingredients and blend until uniform. Put the "plum" sauce and cooked tofu strips in a plastic bag and let it marinated for a several hours in the refrigerator.

After the tofu strips have marinated and you have prepped the veggies, you can start assembling the spring rolls. Dip a sheet of rice paper in warm water for 5-10 seconds or whatever the packaging says. Lay the wet rice paper on a plate. Across the center spread a line of spouts, sliced cucumbers, shredded carrots, diced green onions, and marinated tofu.

At the ends of the filling line, tuck in the sides of the rice paper. Pull one of the long sides of the rice paper over the filling line. Tightly tuck it under the filling line and roll. If I just totally confused you, check out this video on You Tube: "Viatnamese Spring Roll"

Now the only thing left is to mix together the dipping sauce ingredients and sprinkle your plate with green onions.

Side Note:
If you aren't serving a party or large family, you can store the ingredients separately and the prepare on demand or you can store pre-made rolls.

April 18, 2009

roasted parsnip fries with creamy curry dip

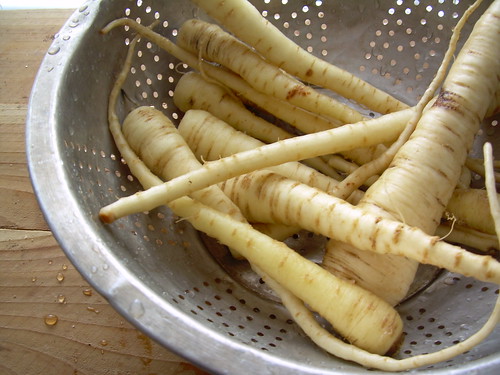
Today was the tail end of a heavy snow/rain storm. The farmers at the farmer's market seemed pretty elated with the precipitation even though it meant they had to sell their produce in bad weather. We were pretty happy too since they showed up despite the bad weather. We were able to purchase some local produce including parsnips!


The farmer that we bought the parsnips from recommended roasting them like steak fries so when we got home, that's what we did! We were brainstorming a dip for the fries, and we remembered a delicious curry dip with pub fries that we had at local restaurant a few weeks ago. Since it was still storming outside, we decided to entertain ourselves by making the curry powder from scratch, but you could just as well use a store bought curry powder.


Serving Size: snack for 4

Roasted Parsnip Fries Ingredients:
1/2 lb parsnips
2 T. canola oil
3 cloves garlic, minced
1 t. cumin, ground
1 t. coriander, ground

Creamy Curry Dip Ingredients
3/4 c. (6 o.z.) yogurt
1/4 c. water
1 T. frozen turmeric, minced (or 1 t. ground turmeric)
1 t. frozen ginger, minced
1/2 t. cumin, dry roasted, ground
1/2 t. cardamom, dry roasted, ground
1/2 t. coriander, dry roasted, ground
1/2 t. dark brown mustard, dry roasted, ground
1/4 t. cayenne pepper, dry roasted, ground

Cut the parsnips into quarters or eighths and put them in a large bowl. Coat them in oil and spices. Roast the parsnips at 425 for 30 minutes in a preheated oven, flipping them halfway through.

If using pre-made curry powder, just add 1-2 tablespoons to the yogurt, along with 1 T. of canola oil. If attempting to make the curry powder from scratch, grind and dry roast all of the spices. You can use ground turmeric, but I bought a tiny piece of fresh turmeric root and wanted to try it out. If using frozen minced turmeric or ginger (a great way to keep these ready for use), cook them in 1/4 c. water in the microwave or on the stove until the water is all or almost all gone. Add 1 T. oil, the dry roasted spices, and finally, the yogurt!

February 15, 2009

peppery sourdough pretzels with nutritional yeast sauce

What best says "happy valentine's day, honey"?? Homemade pretzels with locally brewed beer! Luckily for us, Boulder has a local brewery that sells growlers! Mmmmm...

Serving Size: 15 pretzels

Pretzel Ingredients:
1 c. whole wheat flour
1 c. white flour
1/2 c. sourdough starter
1 1/2 c. warm water
1/2 c. warm water
4 T. oil
2 t. salt
2 t. fresh ground pepper
3 cup white flour


Nutritional Yeast Sauce Ingredients:
1 1/2 c. nutritional yeast
1 c. soy milk
1/4 c. oil
1 t. salt
1 t. onion powder
1 t. garlic powder
1 t. paprika
1/2 t. black pepper


We love sourdough bread so we figured that our pretzels should be sour as well. The sourness in sourdough comes from a starter of slightly fermented water, honey, yeast and flour. Other than the taste, the best thing about sourdough is that you keep the fermented yeast culture alive and add it to the bread you bake for your entire life which means that you could avoid buying new yeast ever again!

If you do not have a sourdough starter already, you will have to get one started 6 days in advance of your targeted pretzel feast. We made our sourdough starter from a recipe in the Tassajara Bread Book (50/50 white flour and wheat flour) though any starter recipe from the internet will work. The basic idea is that you mix together warm water, honey, dry yeast, and flour. Then you put the starter mixture in an open jar and allow it to ferment for five days stirring the mixture once a day. Once you have a sourdough starter, you rejuvenate it every week or so by starting a new loaf of bread as explained below.


After the sourdough starter has fermented for 5 days, put flour in a large bowl and add sourdough starter. Pour in warm water and mix into a thick paste. Cover the bowl with a damp cloth and set it in a warm place overnight. In the morning or afternoon, remove 1/2 c. of the paste (the same amount of starter that you put in) and save it as your future sourdough starter. Your rejuvenated sourdough starter should now be stored in the fridge and refreshed about once a week as just described.

You can now add the other pretzel ingredients to the paste
. Knead the dough for 5 minutes adding more flour or water as necessary. Let it rise for 2 hours in an oiled bowl in a warm place.

Grab fist fulls of dough and roll them out to 1/2" diameter. Form the rolls into classic pretzel shapes and pinch down the twists and ends with some water. Bring 8 c. of water to boil with 1/4 c. baking soda dissolved in it. Gently drop the pretzels into the boiling water one or two at a time making sure they don't touch. Let them boil a minute on each side and remove to a wire rack. Preheat the oven to 425 degrees.

For the classic pretzel crust, bush a milk and egg white wash on the pretzels. A great alternative is to simply brush them with olive oil and/or soymilk. Next sprinkle the pretzels with your desired toppings like salt, sesame seeds and poppy seeds. Place the pretzels on cookie sheets. So the pretzels don't stick to the cookie sheets, sprinkle cornmeal where the pretzels will rest. Bake for 10-12 minutes at 425 degrees.

The nutritional yeast dipping sauce is super easy. Mix the ingredients with a blender and serve heated or at room temperature.

Side Note:
If you are unable to eat all of your pretzels immediately they will store fine for a few days in a paper bag or wrapped in a cloth. Otherwise, you can freeze the leftovers and reheat them some later day.

January 18, 2009

artichoke and olive pizza

It's pizza time!

Serving size: 6 (2 pizzas)

Dough Ingredients:
3 1/2 c. flour
1 c. warm water
2 T. yeast
2 T. honey
1/4 c. olive oil
1/2 tsp. salt

Optional Dough Ingredients:
2 T. minced garlic
1 T. basil
1 T. oregano
1 T. rosemary
1 tsp. sage

Sauce Ingredients:
16 oz (1 pint) tomato sauce
2 T. olive oil
2 T. honey
1 T. basil
1 T. oregano

Pizza Toppings:
black olives
artichoke hearts
caramelized onions (1 red onion, 2 T. canola oil, 2 T. margerine/butter)


Note that the dough will need around 2 hours to rise, with a good punch in the middle.

My favorite part of making pizza is adding things to the dough, like LOTS of garlic and basil and oregano...and eating the bits of leftover dough...and the smell of the garlicky dough in the oven. We find that making pizza dough in a food processor is pretty convenient, but you can also knead it all by hand or do it all in a bread machine. The best pizza dough recipe that we've found is Mitch's Basic Pizza Dough--I like it because it uses honey. The link includes directions for all three methods.

If you're using a food processor, you can use a dough blade, but the regular blade works just as well, if not better. If you do use the regular blade, you can put whole, peeled, garlic cloves into the machine first and let the machine chop them up. Otherwise you can chop them up yourself or use a garlic press. You can use whole wheat or white wheat or half and half or half corn meal--whatever you like!

Start by putting 1 cup warm water (about 85 to 115° F) in the processor. Add the honey and salt and mix or low for 20 seconds. Add the yeast and stir with a spoon or mix on low. You should start to see bubbles and smell the yeast working. Add 1 cup of flour, mixing again. Add the olive oil and mix again. Add the remaining flour and any optional additions (basil and oregano are my favorites, but I've also done rosemary and sage). Mix on high until the dough balls up, adding more water or flour as needed. Then take the dough out, balling up loose scraps, and knead for 5 minutes (use both hands, rolling the dough forward, trying to seal the seam with your palms on each fold). It's good if you play some loud music and get really into the kneading until you forget you are even doing it. You can try spinning the dough up in the air here; it's pretty fun. Once you've had enough, ball up the dough, closing and pinching the seam closed. Coat the ball with olive oil and put into a metal, ceramic, or glass bowl. Cover with a damp towel (I use warm water to make it damp). You will now let the dough rise for about 45 minutes. Put the bowl in a warm place. During the winter, putting it above the pilot light, or on a radiator, or in a barely warm oven works nicely. If it is too warm, then it will start to bake! After around 45 minutes, the dough should be close to double in size. If not, then double-check your yeast. Punch your fist into the ball to deflate it. Leaving the big fist hole just as it is, let the dough rise for 1-1.5 hours. (The Tassajara Bread Book is a great reference for the "why"s of bread making.)

While the dough is rising this second time, you can prepare the other ingredients. For the sauce, you can use tomato puree or sauce directly from the can or jar, or you can mix in some tomato paste for a thicker sauce. You can also add other ingredients to make a tastier sauce. For this recipe, I put 2 T. olive oil in a saucepan, them added around 16 oz (1 pint) of sauce. Then I added 2 T honey for a sweeter sauce and some spices (1 T. each of basil and oregano). Add some salt here if you like. When the sauce is mixed up and warm, it is ready.

Now is when I caramelize the onion. You may have noticed that we didn't put cheese on this pizza. We find that often, homemade pizza doesn't need cheese to taste good, especially with caramelized onions on it. Cut up 1 onion (the sweeter the better: vidalia or red are nice) into semicircles and cook on the stove in oil on really low heat. Cooking them slowly will allow the sugar in the onion to caramelize. You can also add honey or sugar for even sweeter and more caramelized flavor.

You can get other ingredients ready now too. The pizza in the photo has black olives and artichoke hearts on it. You could also reconstitute sun dried tomatos or dried mushrooms in wine or water. Even in winter the possibilities are endless: fried tofu covered in bbq sauce, indian curry pizza, thai pizza.

After letting the dough rise this second time, roll it out. Before you do so, get the oven heating up to 400 F. The amount of dough made by the ingredient amounts above is good for two medium pizzas. After rolled out, bake the crusts for 5-10 minutes so they don't get too soggy when you add the sauce. Add the sauce and the ingredients and bake some more until the crust is golden brown. You can put olive oil on the crust and more spices on top of the pizza if you like. That is some good pizza!