
 We live in a 550 sq.ft. apartment in "downtown" Boulder. We like the location. We can walk or bike to anywhere we want/need to go. Of course, I would love to own instead of a rent and I would LOVE to have a yard but that is just going to have to wait. In the mean time, I am trying to figure out container gardening.
I do not have a green thumb but I desperately want one. It is a good thing I have an entire life to make mistakes and learn! The last few years, I have half-heartedly tried to grow annuals like cabbage and squash in containers. I have killed said annuals in an assortment of ways. For example, I have forgotten to water them, left them out in huge storms, given them too dense of soil, let them get eaten by bugs, etc, etc. Basically I neglect them at some point and for a container garden that is definitely NOT COOL. This year, since I am finally free of school, I promise not to neglect my container garden.
Water management is one of the trickiest things to container gardening. The soil in containers dries out much quicker than that in the earth. Annual crops that are grown in containers require water at least twice a day! That's a lot of human input! No wonder I end up messing things up. So, just in case I get flaky or I choose to go away for the weekend, I built a self irrigating planter.
A self irrigating planter stores water at the base of the container so that the roots pull it in as needed. Stores sell pre-made self irrigating planters but it will cost you since it is a specialty item. Many people build their own out of things like rubbermaid storage containers and 5 gallon buckets. Check it: Self Irrigating Planter Resources on Homegrown Evolution
I like the thrift of these designs but for myself I want to explore the possibilities of plastic planters that are terra cotta colored. Why? Because I want our DIY self irrigating planters to blend in with all of our other standard pots which are terra cotta. Also, the terra cotta aesthetic is cleaner and warmer which is important since I want my apartment neighbors and landlord to like what I am doing.
Ingredients:
18 in. (at top) round plastic planter, terra cotta colored
12 in. (at top) round plastic planter tray
empty earth balance container
12.5 in (at base) round plastic laundry basket
18 in. long, 1 in. diameter irrigation pipe
zip ties
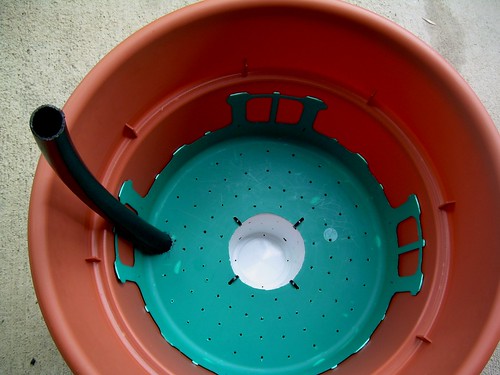
Put the planter tray inside the planter. It should perfectly nest at the base of the planter. The planter tray that we chose will hold 10 cups of water. Overflow water will fall over the sides of the planter tray and through the holes in the base of the planter.
Leave an air gap above the water so that plant roots can breathe. Drill 4 small holes in the planter just above the planter tray to supply air to the air gap.
Find a plastic laundry basket at a thrift store that will nest inside planter a few inches above the base. The laundry basket will hold the soil above the water resevoir and air gap. Drill small holes in the laundry basket so that the roots have access to air. Cut out holes for the wicking chamber at the center and irrigation pipe on the perimeter. Remove most of the side lattice of the laundry basket.
The wicking chamber connects the soil to the water. Create a wicking chamber by drilling holes in a margarine container. Attach it to the laundry basket with zip ties.
To supply water to the resevoir at the base of the planter, provide an irrigation pipe that goes through the laundry basket to the base. Cut the base of the pipe at an angle to ensure water flow.
 Note:
Note:This design is untested so I will report my observations throughout the season!
Credit:
The tomato plant photo used in the diagram above came from flickr's "sameold2008"
That is really interesting! I look forward to hearing about its progress. Will you be doing tomotoes in there?
ReplyDeleteI've been container gardening peppers and herb for the last couple years (and flowers of course) with pretty decent success. I had some extra tomato plants this year so I'm going to try those out as well, but I'm not as concerned if they don't make it since I've got plenty at the garden.
Good luck! I'd love to see pictures of your container garden.
Is this working out? I'll have a tiny apartment soon enough, so let me know...
ReplyDeleteSo far so good, but it has only been 2 weeks. I will most definitely let you know what I think at the end of the season!
ReplyDelete3 months later...
ReplyDeleteThere are three potted tomato plants in this picture. The large plant on the left is in the self irrigating planter. The other two are in regular planters. Looks like SIP is a winner! I will have to make more of them next year.
Only mentionable revision to the system is that I had to tie down the tomato cage with fishing line so it wouldn't fall over.
This comment has been removed by a blog administrator.
ReplyDelete