November 9, 2013

more pottery!

Not bad for my third and fourth pieces of pottery.   :)

2013.11_pottery (1)

2013.11_pottery (2)

2013.11_pottery (3)

Also, we finally got a digital SLR camera!  Yay for depth of field!  I have been wanting a DSLR badly for at least five years now, but there always seemed to be some financial hurdle to overcome (paying off college, paying for a wedding, buying a house).  With a baby on its way, though, we're going to want to savor those precious moments as best we can.  Plus I figure we'll be saving money if you compare buying a nice camera to taking a child to a professional photographer every few years.  Think DIY, people!

November 3, 2013

pumpkin pie brulee

2013.10_pumpkin pie brulee
Everybody's doing it!  And I think with good reason - this is a tasty food fad.  Honestly, I have never enjoyed pumpkin pie until this pie.  What changed?  The crisp caramelized sugar top makes things so much more interesting and in this case it was paired with a chocolate crust.   If I haven't sold you yet, doing a brulee means you get to play with fire!  I used a recipe from Bon Appetit though next time I will make a less fussy chocolate crust.

October 26, 2013

raised garden bed and sheet mulch

We built this raised garden bed with free wood from Craigslist!  I wanted a raised bed so that we could plant  more frequently harvested garden veggies like lettuce closer to the house and so we could easily put season extending hoops with a clear plastic sheet creating mini greenhouses in the spring and fall.

AND.  We filled the raised bed with sheet mulch - cardboard, manure, and wood chips (all of which we can source for free).  The layers should decompose over the winter and worms and other bugs should churn it up so that by the spring we have an excellent soil to plant in.  Here's a step by step:

Lay down a thin layer of manure.
2013.10_sheet mulch 001


Be sure to water each layer as you go.
2013.10_sheet mulch 002


Layout the cardboard.  Cover any exposed seams with newspaper.
2013.10_sheet mulch 003


Add some more manure. 2013.10_sheet mulch 005


Add a whole lot of wood chips. 2013.10_sheet mulch 006


We covered the top with leaves just because. 2013.10_sheet mulch 008

September 22, 2013

peach tree gummosis

2013.09_peach tree gummosis
Our peach tree got gummosis bad, up and down the whole trunk. I've never seen globs this big. It makes be realize how the amber-preserved mosquitoes from Jurassic Park could really happen.

Gummosis is just the descriptive symptom. Sifting through the internats, it is most likely the tree's reaction to holes drilled by an insect, peach tree borer, or to a fungus, cytospora canker.

I read that some dwarf fruit trees get gummosis as a matter of course, when watered heavily. Ours is a semi-dwarf, but this happened after Colorado's week of record-setting rains (we fortunately didn't get any flooding or hail, but some nearby farms got pretty devastated by hail).

Peach tree borer seems unlikely since they usually burrow below the soil/mulch surface. If it is the canker, that's bad, since you're supposed to remove infected areas and the whole trunk is infected. I'm hoping the tree will pull through. I'm continuing to give it plenty of water.

camelia sinensis blossoms

2013.09_blooming tea plant
Our tea plant blossomed today. It, and the lime tree we got in the spring, seem to be doing fairly well. I've had them on the shady north side of the garage, tucked between irises and alliums. They stay pretty moist there. Surprisingly, tea can be planted as far north as Toronto with the right microclimate, which includes the shady north side of buildings.

You can make a non-caffeinated tea from the flowers or eat them, but I want to see what happens with fruiting.

September 13, 2013

deluge of tomatoes


Prior to the deluge of rain along Colorado's Front Range, we had a deluge of tomatoes ripen in our garden. I canned this pile of tomatoes last weekend.  The resulting 5 pints of pasta sauce will certainly taste good in the winter!

September 7, 2013

share your skills! worm composting class

2013.08.26_worm bin class10

Exciting things are happening in Wheat Ridge!  We are part of a newly developing group called Live Local Harvesters that is building community around gardening, urban homesteading, livestock, local agriculture, etc.  We have monthly potlucks sometimes accompanied by food politics movies.  We have informal skill sharing classes led by community members.  We have informative barn raising events like for example a group set up drip irrigation in one person's backyard and everyone left knowing how to do it in their own yard.  We have a message board where people can ask questions, post new discoveries, or host improptu events.  It's all very fluid and energized which is very exciting.

Anyway, Eric recently taught a skill share class on worm composting and building worm composting bins.  Everyone who attended and wanted a worm bin left with a worm bin that they helped to build and some worms.  It was an excellent community building event! 

August 31, 2013

wax moths in the beehive

2013.08.30_wax moth infestation 05
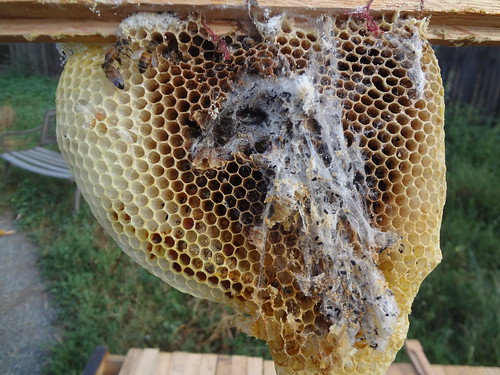
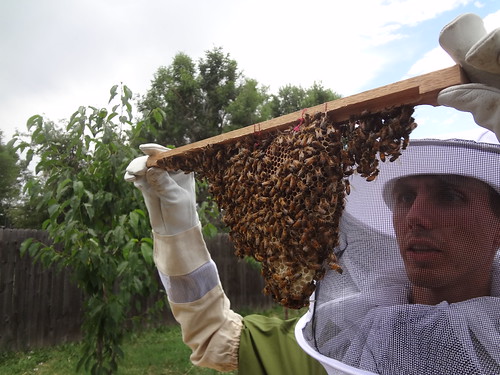
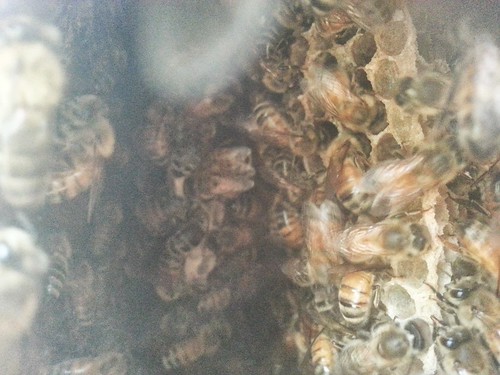
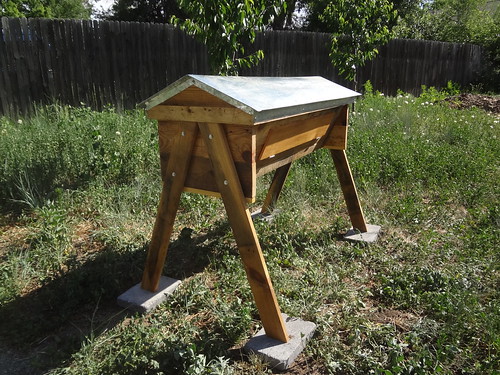
Well, our honeybee colony's population has continued to decline (though I've continued feeding them) and yesterday I looked in the observation window and discovered that wax moth larvae had destroyed about half of the comb. The adult moth lays eggs in the comb and when the larvae hatch, they plow through the comb, eating everything in their path: beeswax, honey, stored pollen, brood, and even wood.

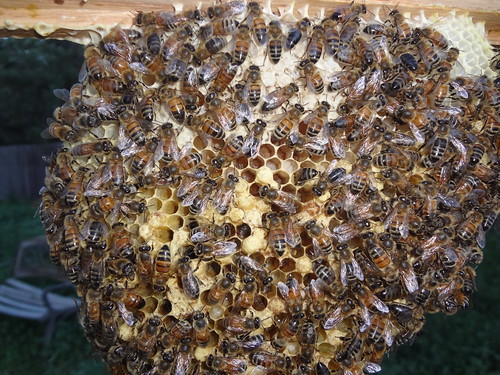
This is a sign the colony is too weak to defend itself–a strong hive would not let this happen. Perhaps if I had done an inspection of the combs more recently (pulling each one out to look at it), I would have discovered the moth larvae sooner. Then it may have been contained to one comb, as opposed to three.

There's not much you can do about wax moth larvae. I brushed the bees off the infested comb, squished the larvae (would make good chicken food), and saved some of the more intact comb to try to reuse. I put this comb in the freezer to kill any moth eggs.

It doesn't seem likely that the colony will survive the winter. I've been seeing yellow jackets in the hive as well, another sign that the hive is weak. It's possible that the queen is already dead, since I didn't see any new eggs or (bee) larvae in the hive, just a few capped brood cells. Sad, but I feel we did everything we could to improve their chances of survival. At least we have some built comb we can save for future colonies, and we've gained some experience.

To close, some interesting words on wax moths, from Les Crowder and Heather Harrell, authors of Top-bar Beekeeping: Organic Practices for Honeybee Health:

Although we may not see them, there are wax moths, either latent or active, in all beehives. Pregnant moths have a scent-cloaking ability and slip into the hives past the guard bees and lay eggs. Tiny threadlike larvae then begin chewing their way through the combs, eating cocoon silk, honey, pollen, bee larvae, and beeswax. Wax moth larvae actually are unable to digest combs of clean, pure beeswax and instead thrive on old black combs filled with bee feces and layers of cocoons.
Sometimes we hear of hives succumbing to wax moth, but in many cases this is because all the combs in the hive simply had gotten too old and dirty to house bees, so the bees allowed the wax moths to take over. In a healthy hive, the bees in a colony are constantly weeding out wax moth larvae. If the hive gets sick or queenless and the population of bees diminishes, wriggling masses of wax moth larvae proliferate and destroy the hive. However, if a hive is healthy and strong, the bees can keep them at bay and even use them to remove old, unsafe combs. We consider wax moths to be symbiotic organisms in a beehive, like the wrecking ball that tears down an old condemned building to make space for new construction.
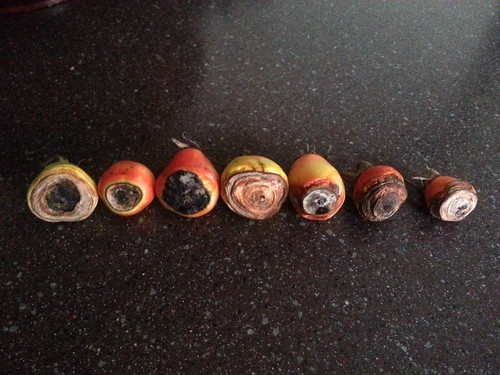
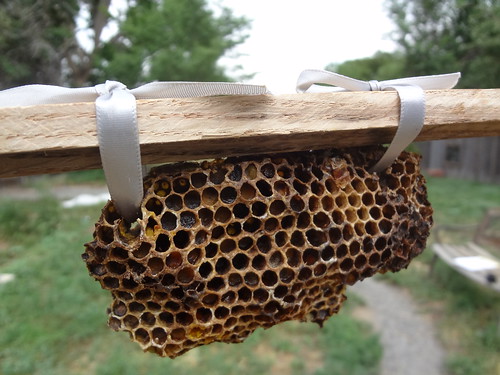
Sure enough, the old combs I had hung from top bars to give the bees a head start were the ones most destroyed by larvae.

August 18, 2013

flax and carrot pulp crackers (gluten-free)

2013.08_carrot crackers
I wasn't going to post about these, but they came out so good. It is amazing that they are gluten-free, since they are so flaky and crispy and satisfying when you want something that goes "crunch."

A while back, I juiced a bunch of carrots and froze the carrot pulp that was extracted, since I heard you could use it to make crackers. So that's what I did. Here is the recipe that I used: Flax & Carrot Pulp Ginger Crackers. Basically, you grind the flaxseed (coffee grinder works well) and combine with the juicer pulp and some water and spices.

I also added sunflower seeds, some lemon juice, and salt. I baked them instead of dehydrating since I didn't feel like rolling them out in a doughnut shape. I used my classic technique of perforating the rolled out "dough" with a pizza cutter halfway through baking.

I have a lot more carrot pulp in the freezer, so I'll definitely be making more of these. I'll have to make a batch with amaranth seeds since I've found those to be really nice in crackers.

August 17, 2013

pottery

2013.08_pottery

I am a big fan of pottery.  I love the handmade imperfect beauty of it.  I also appreciate that it is a functional art form—you mean I can eat my granola out of that??  Pottery can be pricey though so most often I find mine at thrift stores.  Occasionally, when I come across an artist I really like (ahem Alex Watson), I will drop the money for a new piece.

Needless to say, I've been wanting to take a wheel throwing pottery class for years now. It just so happens that we moved down the street from an art studio that offers pottery classes, so I signed myself up!  These are my first pieces.  While they are not my favorite, it is super exciting to be learning and experimenting.  The process is intriguing too—it is meditative and humbling, you can suggest a form but you can't force it, and similar to watercolor you have to know when to stop and how to accept what is.

August 14, 2013

moment of truth for the bees

bee metropolis
Today, Wednesday, August 14, 2013 is the moment of truth for our colony. That is six weeks after we installed the colony. Honeybee workers live an average of six weeks during the busy summer, so all the worker bees in the colony will have been born and raised in our backyard hive.

The population has dropped to about half of what it was when first installed. This made me very nervous as I inspected the combs the other day, since I had only seen a few tiny eggs during the last inspection. I was relieved to see a spattering of curled up white larvae and capped brood cells:
2013.08_bees brood
Not as much brood as I'd like to see, but still reassuring. However, it looks like much of the brood is has domed caps, indicating that it is drone brood. Hopefully there is at least some worker brood, or else we might have an unmated queen, who can only produce unfertilized eggs that become drones. While drones propagate the genes of the colony, they do not "work" and don't contribute to the immediate survival of the hive. In fact, they consume hive resources. Naturally, they are kicked out of the hive in the autumn.

I was reassured to learn that worker bees live 4–9 months through the winter season, and that a colony's population fluctuates: from 60,000–80,000 in the summer to 20,000–30,000 in the winter.

The weeds that make up the majority of our backyard right now are waist high. I had worried that they had gone to seed before we could cut them back. But the other day I was amazed to see a veritable metropolis of bees, like an army of window washers, furiously scanning up and down the stalks of tiny flowers so small I didn't know they were flowers until I saw the bees' interest in them. They were really loving the one weed that dominates the backyard that I haven't been able to identify (see top photo). It made me really glad that we hadn't cut it all back yet. It seems like it would be difficult to time the cutting to be after flowering and before seeds are mature. We may do the cutting in stages, so that we don't destroy all of the potential nectar sources/habitats at once.

The bees are also loving the buckwheat that I dispersion seeded in an area loosely mulched with wood chips:
2013.08.06_bee on buckwheat

August 12, 2013

recent harvest

2013.08_some harvest
Just wanted to capture this for our record. I picked some tomatoes and a lot of purple string beans. I also harvested a number of things that we had mostly forgotten about or given up on: carrots, beets, radishes, chard, and kale. We even had three kohlrabi plants that are finally doing okay.

I also cleared the weeds around the cucumber plants and discovered a bunch of ripe cucumbers:
2013.08_cucumbers

August 11, 2013

blossom end rot

2013.08_blossom end rot
The first set of ripe tomatoes we've gotten have all had black or brown spots on their bottoms, which looks like blossom end rot. Anna from The Walden Effect, explains that it isn't caused by a virus, bacterium, or fungus, but rather by calcium deficiency. This doesn't necessary mean you need to go crush up some eggshells by your tomato plants; Anna explains that a range of factors, from drought, root damage, excessive heat, or even fast plant growth, can lead to calcium deficiency.

Luckily, blossom end rot is most common on early season tomatoes, and, as we've noticed in our garden, the problem diminishes with subsequent sets of ripening tomatoes. If the spot is small, you can simply cut it off and enjoy the rest of the tomato.

August 9, 2013

my first quilt!

2013.08_quilt (1)

2013.08_quilt (2)  2013.08_quilt (3)

I made my first ever quilt and I promptly gave it away!  I was getting a little attached by the end of the project but it felt good and meaningful to gift it to my good friend since grade school.  It is a baby quilt you see and my friend is expecting to bring a baby into this world in just a few months!  Now what kind of quilt should I make for my own bed...

(pattern modified from "The Practical Guide to Patchwork: New Basics for the Modern Quilt Maker" by Elizabeth Hartman)

July 16, 2013

top bar hive inspection - day 10

2013.07_bee inspection day 10_1
The bees had started building comb on four top bars after 10 days. We haven't been able to glimpse the queen yet, and we couldn't spot any eggs or larvae, so we'll have to keep an eye on it in case the queen is dead.

I had to trim a little off one of the combs that was a little crooked. The honey that stuck to the knife is some of the best tasting I've ever had!
http://di-wineanddine.blogspot.com/http://di-wineanddine.blogspot.com/

We finally removed the old comb that was sitting on the bottom mesh screen. We had originally put it there to attract the bees to prevent absconding. We decided to tie it up to a bar let them build off it. Probably not necessary, but it looked in maybe, just maybe there was some larvae in it. Ribbon works well since it is broad and won't cut through the comb like thread might.
2013.07_bees inspection day 10_adding comb1

With all the hot weather we've been having (highs in the 90s), the bees have been bearding so I added some roof insulation. I used a 1" thick piece of salvaged polyisocyanurate (yellow, foil-faced). The facing had come off one side, so I wrapped it in sheets of aluminum foil in order to keep foam particles from falling off into the hive. The foil also helps since it acts as a radiant barrier. We drilled some gable vents to ventilate the space above the insulation and below the metal roof, to try to reduce the solar gain. We can plug the vents during the winter.
2013.07_bees inspection day 10_roof insulation

July 7, 2013

we got bees!

2013.07_we got bees
After giving up all hope of getting honeybees this season, we were able to get a colony from Five Fridges Farm. This colony had been removed from a (human) structure by a humane bee removal company. Because they had already been established and were forcibly removed, as opposed to a captured swarm, they are stressed and it is less likely that they will survive or stick around in our hive. We tried to make our hive as appealing as possible by sewing some old comb to one of the top bars and putting some lemongrass essential oil (mimics the queen pheromone) on the inside.

Doing the swarm pour:


Inspecting the hive the next morning:


For the first few days, there was a lot of activity outside the hive, with maybe 1/3 to 1/2 of the colony clustering on the outside of the hive:
bees bearding on outside of hive

I was worried that this was a sign they were getting ready to swarm–possibly leaving with a second queen. After four days, the cluster on the outside was gone, and I was able to see some fresh comb through the observation window–a good sign that the bees have decided to stay!
new comb

July 2, 2013

first tea harvest

2013.06 tea harvest
I just drank the first cup of tea from our indoor/outdoor tea plant. I wasn't expecting it to be that good since I harvested old leaves instead of young leaves as is recommended. Also, I'm not sure I did the oxidization process correctly.
After picking the leaves, I crumpled them with my hands and left the to oxidize. After a day, it didn't seem like they were oxidizing–they just started drying out. I steamed them a bit and then crumpled some more. After leaving them a few more days, they turned a little brown and smelled like rotting leaves in fall.

I thought the tea made from these autumnal leaves would be gross, but it was actually okay. I suppose this came out like an oolong, semi-oxidized. Next time I hope to pick young leaves.

June 27, 2013

verdolagas con huevos

201306_verdolagas con huevos
Another great use of purslane! This is a traditional Mexican dish and it turned out really well. I coarsely chopped the purslane in a food processor which saved chopping time.

Sauté onions and purslane, then add beaten eggs, cook until the eggs firm up, and season with salt. I also added garbanzos which helped change up the consistency.

Topped with some purslane tzatziki!

Recipe: http://www.examiner.com/article/huevos-con-verdolagas-eggs-with-purslane-recipe

June 26, 2013

purslane tzatziki

201306_purslane tzatziki
I harvested an enormous amount of purslane, which is our "volunteer living mulch." One of the things I made was purslane tzatziki. Like spinach and lambsquarter, purslane is high in oxalic acid. If you're worried about oxalates, it is sometimes recommended to consume calcium within 30 minutes of eating the oxalate-containing food, so pairing purslane with yogurt makes a lot of sense.

(though I pretty much made up the proportions)

June 25, 2013

thou shalt sit on thy front porch and greet thy passerby

2013.06_flagstone path (1)
Our house came with a combination entry walk/ porch that was a little crowded for my liking.  I personally like front porches that are generous, celebrated places that have the potential to activate community.  This lead us to separate our entry walk from our porch.  My Dad helped with the digging.  Thanks, Dad!  Eric and I went to a few stone yards to pick out the stone.  Then we installed the flagstone path our very selves.  We also put in switch grass for visual interest and biomass along with gypsophilia (baby's breath) for a historic throw back to what was grown on our neighbors land way back when Wheat Ridge was carnation capitol of the world.

Check out the different scales and textures of stones!
2013.06_flagstone path (2)


Of course, we gleaned our design inspiration from the internet.
Landscaping Network


Hammerhead Stoneworks


??

June 23, 2013

lambsquarter saag paneer

2013.06_lambsquarter


I picked a pound of lambsquarter from the various plants scattered around our yard. I really like the taste of lambsquarter; it is quite like spinach. Since it can be tedious to pick the individual leaves, it is nice when the plants get big and have large leaves. I also found it possible to twists the top leaf clumps off all at once, which speeds up harvesting a bit. What it your preferred method of harvesting lambsquarter?
I roughly followed this 101 cookbooks recipe, but instead of cream, I used almond milk, yogurt, and some ground peanuts and almonds.

Oh, and I subbed delicious Nabulsi cheese for the paneer.
2013.06_lambsquarter

June 22, 2013

top bar beehive

2013.06_top bar bee hive (1)
We finished the top bar beehive!!  But it doesn't look like we will have any inhabitants this year... We were on a few lists for getting swarming bees but an unusually low number of bees actually swarmed this year.  It could be a sign of the general health issues that bees have been facing lately including colony collapse disorder or it could be because all our late spring snow reduced early nectar supplies.

While we've been waiting for our swarm lists to pan out, Eric has been attempting to lure a swarm to our hive with a cotton ball of lemongrass essential oil because that supposedly mimics a queen bees pheromones.  He sweetened the offering with sugar water and a few chunks of bees wax.  No takers though.  Now that we are past summer solstice, it is unlikely that bees will swarm and even if they do they will not have much time to build up a new hive for winter.

June 16, 2013

lemon rice soup

2013.06_lemon rice soup
This just in: peas!  Every spring I get a serious case of ants-in-the-pants in anticipation of eating my garden veggies.  You'd think I would know by now that these things take time.  Ah well.

I tried this soup recipe from Martha Stewart in the winter because I was craving lemon.  It was good but I felt that it needed spring veggies in it so I made it today with fresh snap peas.  Much better.  Next time I make this soup I will use some interesting mushrooms instead of the fake meat product because, well, that's more my style.

Ingredients:
8 c. veggie broth
1 1/2 c. white rice
2 Quorn chik'n cutlets (or mushrooms)
2 c. snap peas (or asparagus)
3 eggs
2 lemons
dill
salt
black pepper

In a large pot, bring the veggie broth and white rice to a boil.  Reduce to a simmer for 20 minutes or until the rice is cooked.  Heat up the fake chicken per the packaging.  Slice it up so it looks shredded.  Add the fake chicken to the cooked rice.  Whisk the eggs.  Juice the lemons.  Pour the lemon juice into the eggs while whisking.  Slowly pour 1 cup of the hot rice broth to the eggs while whisking.  Pour the tempered egg mixture into the soup and stir.  Add dill, salt, and black pepper to taste.  Cut the snap peas into bite sized pieces and add fresh so they keep their crunch.  Enjoy!

June 15, 2013

pistachio kale pesto

2013.06_pistachio kale pesto
Why wait for basil?

Ingredients:
pistachios
kale
grated parmesan cheese
garlic
olive oil
lemon juice
water
salt
black pepper

Blend the pistachios in a food processor.  Lightly steam the kale.  Throw everything in the food processor for a whirl.  Adjust flavors as necessary.

June 14, 2013

harvesting mallow (malva neglecta)

2013.06_mallow harvest
Like good permaculturalists, we are trying to start small and close to the house. We have roughly 1,000 ft² of annual beds (10 times bigger than our previous two years' community garden plot) and that feels very big with all the bindweed we're facing.

As I documented earlier, the remainder of the 11,000 ft² lot is some turfgrass, some xeriscaping, and the rest a mix of mallow, glechoma hederacea, dandelion, and some native grasses and wildflowers.

There is a lot of mallow. So, I harvested a bunch for mallow tea. What is the best method for harvesting?

I tried two methods: 1) picking individual leaves and then drying; and 2) cutting large bunches of mallow, drying, and then separating the leaves.

I think method #1 is slightly easier. Pick method #1 if you want to be outside. Pick method #2 if you want to be inside.

Either way, multitasking by listening to podcasts/audiobooks or conversing is good!

Either way, drying in a paper bag is the way to go in our climate.

Also, just learned that we have one globe mallow plant, which would be even better for tea.

June 13, 2013

simple and delicious lettuce tofu wraps

Julie and I love eating lettuce wraps this time of year. There have been days when I ate wraps for breakfast, lunch, and dinner. I mix it up with whatever is handy: beans, hummus, olives, etc.

Heat up a tortilla for 20 seconds and put on some olive oil and nut. yeast: 2013.06_wrap1

Lay on some thin slices of firm tofu (yes, not cooked, but it is good!): 2013.06_wrap2

Cover with more nut. yeast and season with cayenne, garlic powder (or my favorite, sambal oelek): 2013.06_wrap3

Pile on as much lettuce, arugula, purslane, etc. as you can fit: 2013.06_wrap4

Roll up and enjoy:
2013.06_wrap5